So, originally I got into home brewing with the plan that I was only going to brew from extracts. The reasons for this were I could start with premade kits to make things easy on myself, the initial output of money for equipment was less, and where I live, there is a homebrewer who has made award winning recipes from extracts. If it’s good enough for him to win awards with, it’s definitely good enough for a novice like me to brew with!
With that plan in mind I made a few extract kits from Brewers Best – gotta say I do love their kits, good ingredients, easy instructions to follow, and I was able to move from straight extract kits to steeping grains as well. Even my wife, who does tolerate my brewing hobby remarked that they were getting better and that she liked how the house smelled on brew day.
From there the rest you can pretty much put together in your mind………made a few recipes without premade kits, tried my hand at partial mashes, and now, I am ready to move to all grain brewing.
Where to start from here?
Looks like I need some new equipment now. Unfortunately I am living life on a budget and SWMBO has heard me tell her how much a top of the line all grain system can go for. Took a bit of convincing but I was able to get her to agree that I can give this a go as long as I was responsible about it. At this point I turned to my 2 best home brewing friends to assist me with some research, namely Homebrewtalk.com and Internet Explorer.
This is what I feel I need to add to my existing equipment list:
1) a bigger boil pot
2) an outdoor propane burner
3) a larger mash tun – my 5 gallon one is a bit too small for some of the brews I want to get to
4) a more accurate scale than the spring one I am currently using
5) brewing software
6) devise a better way to chill hot wort than just my immersion chiller by itself
7) a new stir plate, as my current one burned out – it’s a long story
8) a new Erlenmeyer flask, as mine broke – yup, it’s a really long story
9) a longer mash paddle than the current stir spoon I am using
In my current set up I already had a temp controller, and I made a Son of Fermentation chamber, so I was all set in that regard.
Now that I have a list of what I WANT to add, I trimmed it down to what I NEED to add:
1) a bigger boil pot
2) an outdoor propane burner
3 a larger mash tun
First and foremost, I needed a bigger pot for boiling, and a propane burner as my stove just gets 4 gallons to a small boil, I don’t think it can get 7+ gallons to a boil at all. A bit of research and I was able to see that there were a lot of people out there like me, who wanted to go all in, but were limited by budgets. The 2 biggest things I learned online – THERE IS NO SHAME IN USING ALUMINUM, and a turkey fryer is not a bad way to get yourself into an all grain set up on the cheap. A buddy of mine did warn me that he uses a 40 quart boil pot and still gets the occasional boil over, so I should look for something a bit bigger, if I can afford it (thanks for the tip Al). That’s when I found this, The King Kooker 5012 on Amazon.com.
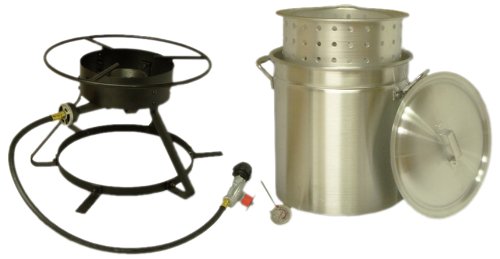
A 50 quart aluminum pot is included!! Not a bad price at all, even better when you consider that it is also available “Used” for even less. Now that doesn’t mean it was used and abused, because according to Amazon’s standards, anything that has been opened and has a damaged box is now “Used”. Top this off with the fact that when it arrives, I can send it back if I think it is not in great shape, and I am ready to give it a try. I read through quite a few of the reviews, and it seems like other home brewers have used it, and the reviews are positive.
I popped down my credit card number and waited for it to arrive and a few days later here it was:

Ok, ok, ok......not the best box I have ever seen, but it was packed inside a larger box with padding. I was pleased with what was inside the box though, because the pot only had one insignificant scuff on it, and it was plain to see it had never been used, the hardware to put the burner assembly together was still bagged. About a half hour later I had it together and it looks like this:

Luckily the next day we didn't have much going on, so while I was working in the shed (project to be shared with you later) I set it up to boil 10 gallons of water. If you ever use aluminum pots as your boil pot, I have read that it needs to have water boiled in it for an hour prior to the first use to oxidize the container.
Filled it up with 10 gallons of 68 degree water from the sink.
In 28 minutes I had 10 gallons of water at 165 degrees, which I would use for mash temp.
In 48 minutes from the original start time I had 10 gallons of a rolling boil the likes of which I had never seen on my stove in the kitchen.
All in all, I am pretty happy with this, and as soon as I put some things together I will be able to have my first all grain brew day.

Thanks for sticking around to the end of my first blog. I will have more to come and hopefully will update on a regular basis.
Chris
No comments:
Post a Comment